

Introducere
For most people who live outside of the Southern U.S., the opportunities to taste excellent, smoky, low-and-slow Southern-style barbecue pork ribs are few and far between. You may be lucky enough to have a backyard and a smoker or kettle grill, but even then, nailing that perfect temperature time after time can be a tricky affair that takes years of practice to get right. Enter sous vide.
With a vacuum sealer and an Anova Precision® Cooker or Precision™ Oven in your kitchen, you can have guaranteed perfect results time after time. We’re talking pork ribs with a crusty bark or rich glaze of sauce and a texture that’s tender, yet meaty. Ribs that don’t fall off the bone (any barbecue lover will tell you that ribs that fall off the bone are overcooked), but that release with just a gentle tug of the teeth.
Not only that, but it can all be done 100% indoors, which means that even apartment dwellers or snowed-in homeowners can enjoy the best barbecue ribs year-round. Here’s how.
The Basics of Sous Vide Pork Ribs
The biggest advantage of cooking ribs sous vide is that you can set up a low and slow cook without needing to monitor the meat. (This is not the case if you cook the ribs on the grill or in a traditional oven.) Even better, you can really dial in the cooking temperature to get exactly the results you want every time. And it’s really, really easy.

Traditional sous vide ribs consist of an easy, two-phase cooking process:
- Etanșare the ribs in a plastic bag using either a vacuum sealer or the water displacement method and gătit se aduce la temperatura finală dorită într-o baie de apă cu temperatură controlată.
- The temperature of the sous vide bath during the initial cooking phase is what determines the final texture of the ribs.
- Browning the ribs to develop color, flavor, and textural contrast.

If you’d prefer to introduce new sous vide techniques into your arsenal, you can also use the Anova Precision™ Oven to prepare sous vide ribs. Because of the way we’ve designed the temperature sensors and humidity control, the oven will precisely maintain the cooking temperature you set.
You can choose to bag and cook your ribs in the Precision™ Oven just as you would with a Precision® Cooker, or you can cook the ribs without a bag.
Just like traditional sous vide, using Sous Vide Mode in the Anova Precision™ Oven typically is a two-stage cooking process: First, bring the rack of ribs to your desired internal temperature, then sear it in the oven or on the grill to create a flavorful crust.
Look for pork ribs labeled “St. Louis-style” or “St. Louis cut,” which are ribs that have been trimmed down to a nice, even rectangular shape with excess rib tips, cartilage and sternum removed. They’re the best bang for your buck in terms of meat-to-bone ratio and ease of preparation. Baby back ribs will also work reasonably well, although they tend to be a little dryer. Avoid country-style ribs, which are not actually ribs at all. One slab will feed about two hungry people or three moderate eaters.
Ribs come with a tough membrane on the bone side. While you don’t have to remove it, this extra step will make the ribs easier to cut and eat when serving time rolls around. It’s a simple step, so we recommend it.
Temperatură și sincronizare
Ribs are traditionally slow-cooked in a smoker in order to get their copious connective tissue to convert to gelatin, turning the tough meat tender. The rate at which this conversion takes place is a function of temperature and time; the lower the temperature, the longer it takes. At the same time, the lower the temperature, the more internal moisture the ribs will retain as they cook.
So while a rib cooked at 145°F (63°C) will take about three times longer to tenderize than those cooked at 165°F (74°C), they will end up with a more succulent, meaty texture that eats almost like an extra-tender steak. Ribs cooked at a higher temperature will have a more traditional BBQ rib texture with well-rendered fat and meat that shreds as you eat it.
We do not recommend sous vide express for ribs, as it does not give the ribs enough time to tenderize.
Sous Vide tradițional
| Temperatura cuptorului sau a băii de apă | Timp | Textura |
|---|---|---|
| 145°F (63°C) | 24 to 36 hours | Extra meaty |
| 165°F (74°C) | 6 to 12 hours | Traditional barbecue texture |
How to Cook Sous Vide Ribs, Step by Step
Pasul 1
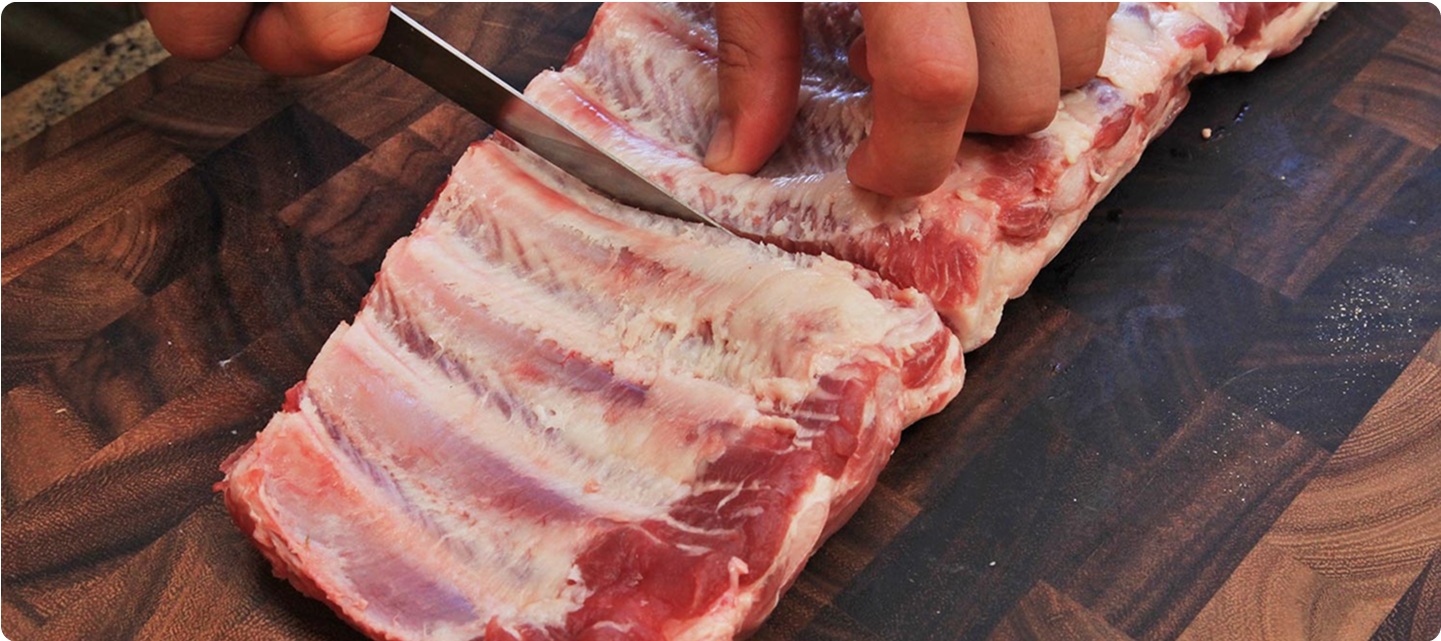
Remove the papery membrane on the back of the ribs using a paper towel or kitchen towel to grip it and pull it away in one piece. Divide each rack of ribs into three to four portions with three to four ribs each by cutting through the meat in between the ribs. Rub ribs generously on all sides with salt and any desired spice rub. If vacuum sealing, add to bag(s) and seal using a vacuum sealer. Refrigerate for 4 to 12 hours.
Pasul 2
Attach a Precision® Cooker to a water bath and heat to your desired final doneness temperature or preheat the Precision™ Oven to your desired temperature.
Pasul 3
Drop the bag in the water bath or place the ribs into the oven. Cook according to your desired time and temperature.
Etape de finisare
Remove the ribs from the water bath or oven. Transfer to an ice bath or the refrigerator to cool completely. Remove from the bag and place on a paper towel-lined plate. Pat dry very carefully on both sides.

Pasul 1
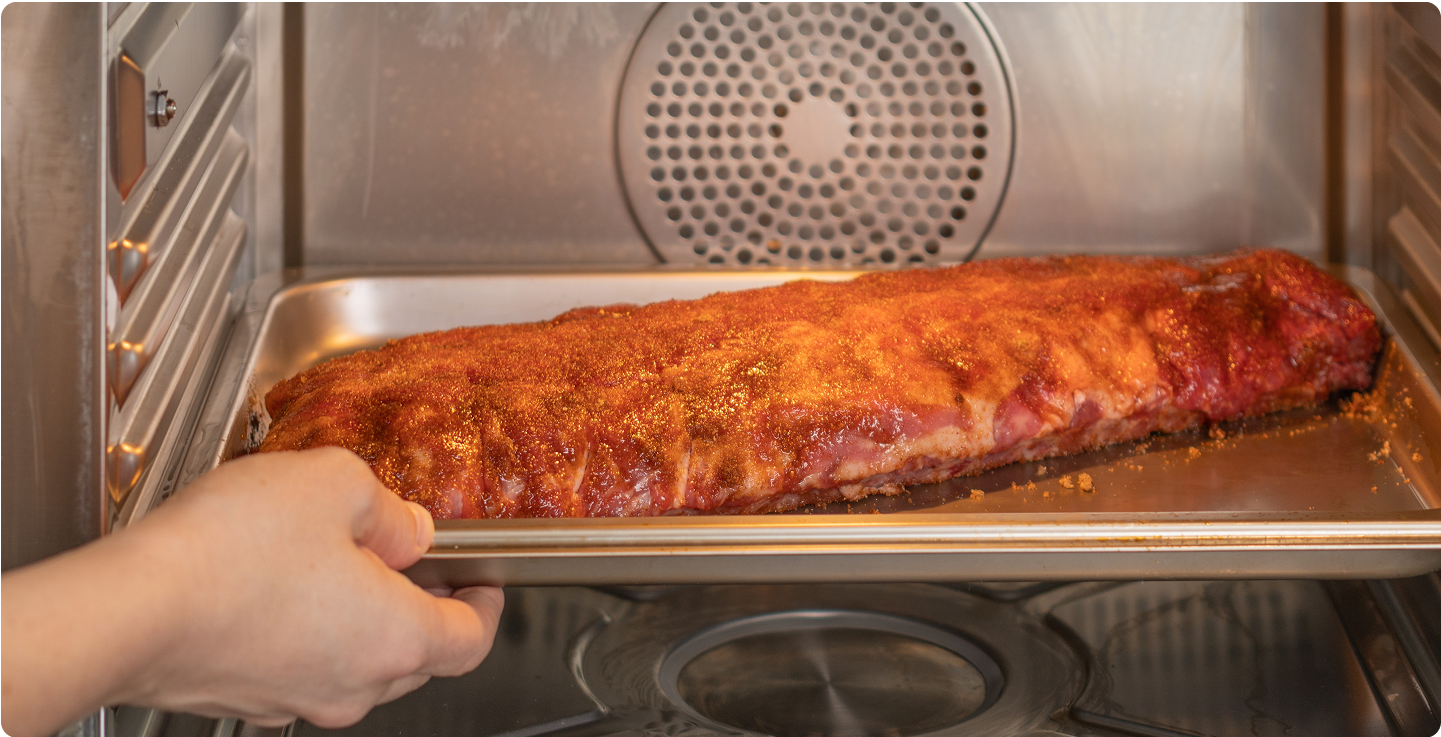
Adjust oven racks to upper and lower middle positions and heat the oven to 300°F ( 150°C). Line two rimmed baking sheets with aluminum foil and place a wire rack in each. Divide ribs evenly on racks, facing up. Transfer ribs to the oven and cook until the surface is sizzling and ribs are heated through, about 20 minutes.
Pasul 2
Brush ribs with sauce and return to the oven for 10 minutes. Remove from the oven, brush with another layer of sauce, and return to the oven until it is dried and sticky, about 10 minutes longer. (For dry-style ribs, omit the saucing and continue roasting until a crusty bark has formed, about 40 minutes total in the oven).
Pasul 3
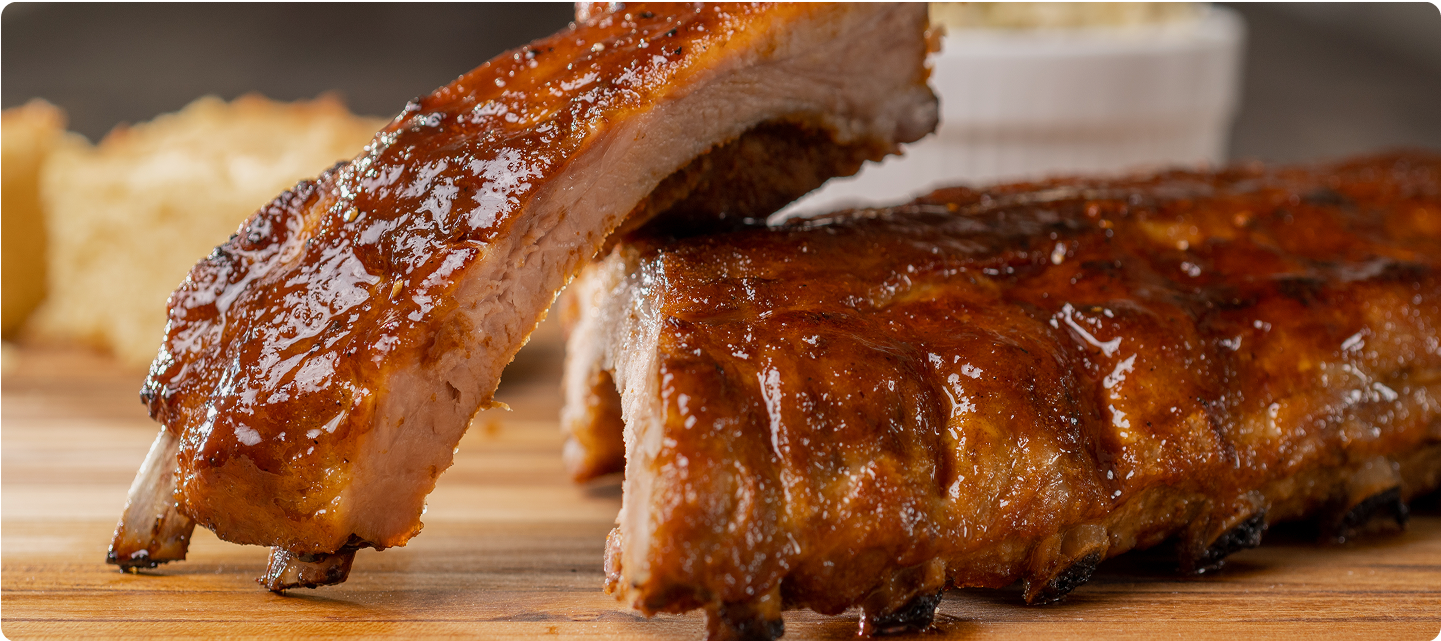
Remove ribs from the oven, paint with one last layer of sauce, and serve, passing extra sauce at the table.

Pasul 1
Adjust the oven temperature for Broiling: Turn sous vide mode off and set the oven to 450°F (232°C) with 0% steam using the Top heating element.
Pasul 2
While the oven is heating, place the ribs on a clean sheet pan, bone-side down. Brush with barbecue sauce.
Pasul 3
When the oven has reached temperature, return the ribs to the middle rack. Broil until the sauce is caramelized, 5 to 10 minutes. Transfer to a cutting board, carve, and serve.

Pasul 1
Light one half chimney full of charcoal (about 2 1/2 quarts (2 L) of coals). When all the charcoal is lit and covered with gray ash, pour out and arrange the coals on one side of the charcoal grate. Set cooking grate in place, cover grill and allow to preheat for 5 minutes.
Alternatively, set half the burners on a gas grill to the medium heat setting, cover, and preheat for 10 minutes.
Pasul 2
Scrape the grill grates clean with a grill scraper, then oil the grates by holding an oil-dipped kitchen towel or paper towels in a set of tongs and rubbing them over the grates 5 to 6 times. Place the ribs facing up over the cooler side of the grill. Cover and cook until ribs are heated through and dry to the touch, about 15 minutes.
Pasul 3
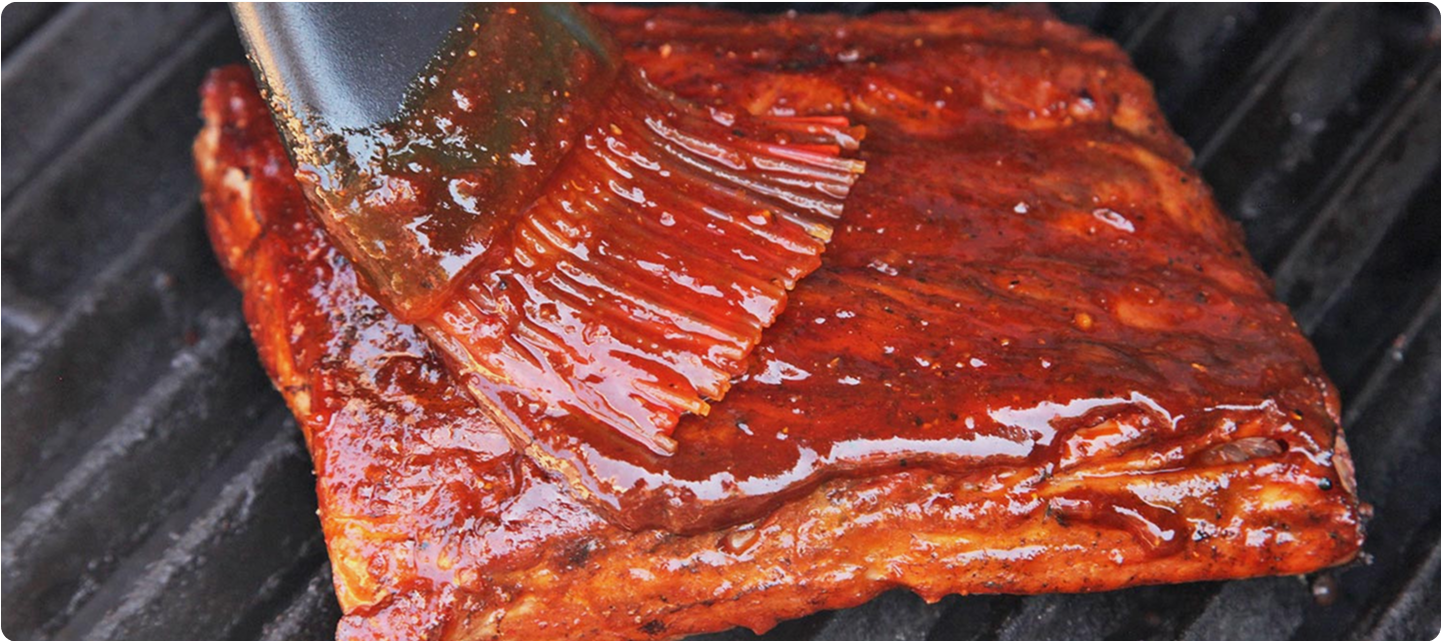
Brush ribs with a layer of sauce and then transfer the ribs to the hotter side of the grill. Cover and cook until the sauce is mostly dry, about 7 minutes. Brush with a second layer of sauce, cover, and cook until the second layer is sticky, about 5 minutes longer. (For dry-style ribs, omit the saucing and continue grilling over the hotter side of the grill until a crusty bark has formed, about 10 minutes total over the hot side of the grill).
Pasul 4
Remove ribs from the grill, paint with one last layer of sauce, and serve, passing extra sauce at the table.

A Closer Look at Seasoning Sous Vide Ribs
Unlike brisket and pork shoulder, we do like to brine ribs before cooking. Brining is the act of soaking meat in a salt water solution in order to change its protein structure so that it retains more moisture as it cooks. Typically, you’d accomplish this by completely submerging the meat.
With sous vide, you can achieve a similar goal simply by seasoning the meat with salt and sealing it in a bag. It’s called dry-brining. The salt draws out some liquid from the meat, dissolves, and forms a brine all on its own. You can also add a few other ground spices and brown sugar to create a dry rub that seasons the ribs while they brine.
Meat that’s salted and allowed to rest ends up significantly juicier than meat cooked immediately, though with prolonged salting, the meat can take on a cured, ham-like flavor and texture. For ribs, we find that applying a spice rub that includes salt, bagging them, and letting them rest for 4 to 12 hours produces the best flavor and juiciest texture.

Getting Smoke Flavor into Sous Vide BBQ
Whether we finish sous vide barbecue on a grill or in the oven, it needs some time post-water bath to achieve a dark, crispy, mahogany crust. But no matter how you finish it, sous vide barbecue will lack the one thing that really distinguishes slow-cooked traditional methods: the smoke. Here are two ways to add it.
Liquid Smoke
Liquid smoke gets a bad rap, but high quality brands such as Wright’s or Colgin are in fact nothing more than smoke and water. They’re made by running moist smoke from smoldering wood chips through a condenser and capturing the liquid that drips out. The water contains the exact same chemical compounds that are transferred to meat during the smoking process, and it is a completely natural product.
A small shot of liquid smoke added to the bag before cooking the ribs sous vide will give your food a mild smokiness that captures most of the flavors of real outdoor cooking. The liquid smoke approach is great if you are finishing your barbecue in the oven, but it will also work if you are finishing outdoors. Adding a smoked product like smoked salt to the rub can also give the barbecue a smoky flavor without any actual smoking in the process.
Live Smoking
If you’ve got yourself a kettle grill or smoker, then you can enhance your sous vide barbecue through a bit of honest-to-goodness smoking. We find that by letting the meat cool a bit (or even refrigerating it for up to a week), we can place it on the cooler side of a 300°F (149°C)-degree kettle grill or smoker let it smoke for a good three hours or so before it starts to dry out at all. This is ample time to develop a deep, dark crust and to get some smoky flavor in there.
Is it better to apply that smoke before or after cooking sous vide? According to folks like Meathead Goldwyn, author of the eponymous book on the science of barbecue, “Meathead: The Science of Great Barbecue and Grilling,” the flavorful compounds in smoke will adhere and penetrate to raw meat much better than it will to cooked meat. This is true, but we find that the amount of smoke flavor we get out of a post-sous vide session in the smoker is ample, and smoking at the end makes the process so much more efficient.
What about the smoke ring?
A smoke ring is a pink ring of meat that appears around the edges of a well-smoked rack of ribs or brisket. It’s purely cosmetic and does not signify smoke flavor or proper cooking.
The smoke ring appears due to the interaction of carbon monoxide (CO) and nitric oxide (NO) with myoglobin, the natural pigment that makes meat red (a close relative of hemoglobin, the red blood pigment). As meat cooks in a carbon- and nitric-oxide-rich environment, its pink color becomes “fixed,” preventing it from oxidizing and turning into metmyoglobin, the brown pigment you see in cooked (or old) meat. A red “smoke” ring will appear in any environment in which meat is slow-cooked in the presence of CO or NO, whether or not any smoke is involved in the process at all.
All that said, you can replicate a smoke ring in sous vide barbecue by using pink curing salts, a.k.a. sodium nitrite. The reaction between sodium nitrite and myoglobin is very similar to that between myoglobin and CO/NO, and it has the same end effect: fixing the pink color. By adding a small amount of sodium nitrite to the spice rub and letting the meat rest in that rub overnight, you end up with a nice pink “smoke” ring after it’s done cooking — no actual smoke involved!
Tips for Long Sous Vide Cooks
A long sous vide cook may not be the first method you start with when you purchase a Precision® Cooker or Precision™ Oven, but it’s an important technique to have in your arsenal. There are, however, additional considerations to keep in mind:
Evaporation with Precision® Cookers
If you’re using a water bath to cook your food sous vide, you’ll want to keep the water bath covered to prevent excess evaporation. Even at the low temperatures of sous vide cooking, water will evaporate, eventually falling low enough that it causes the Precision® Cooker to shut off.
You can cover your cooking vessel with a lid (all Anova Precision™ Containers come with one), plastic wrap, aluminum foil, or ping pong balls. In addition, you’ll want to check on the water level a few times during the cooking process and top it off with room temperature water if needed.
If you don’t cover the water bath and your Precision® Cooker shuts off, you’ll want to test the water temperature to see if the food is still safe to eat. So long as the water in the water bath hasn’t dropped below 130°F (54ºC) for more than 2 ½ hours, you are in fine shape. If you’re running the Anova app, you should receive a notification on your phone if the water level drops too low. Top up the bath, turn on the cooker, and resume cooking.
Dryness in the Precision™ Oven
If you’re doing a long cook using Sous Vide Mode in the Precision™ Oven, you may notice that the exterior of the food dries out over time. This is because the convection fan circulates the steam around the oven and, inevitably, will dry the meat out a bit, even at 100% relative humidity.
In some cases, you may want this! It makes it easier to form a nice bark on the exterior of a brisket or pork shoulder, for example. On the other hand, you may not want it! If that’s the case, we recommend sealing in a bag any food you’re cooking for more than four hours.
Another tip for long cooks in the Precision™ Oven? Make sure the water tank is filled to the top before cooking, and give it a few checks throughout the day.
A Closer Look at Finishing Sous Vide Ribs
Once the ribs have come out of the water bath, they’re fully tender and edible, but they don’t have any of the signature bark that you want in a good barbecue rib. To get there, chill the ribs to ensure that they don’t overcook during the finishing steps. Next, cook them gently either in the oven, or via indirect heat on the grill, letting them hang out until nice and crisp on the exterior.
If you want a Memphis dry-style rib, hit the ribs with a bit of extra rub before they go into the oven or on the grill. For a Kansas City-style sweet and sticky rib, brush them with barbecue sauce during the last few minutes of cooking, letting each layer of sauce dry before painting on some more.
Meal Prep and Make-Ahead
Ribs cooked sous vide can be stored in the refrigerator for up to five days directly in their sous vide bags. Make sure to chill the ribs thoroughly in ice water before transferring to the refrigerator. Ribs can also be frozen after cooking directly in their sous vide bags and stored for up to three months (or longer, if you have heavy duty made-for-the-freezer vacuum bags).